chocolate glazed peanut butter fudge

This recipe started out as a simple but amazing peanut butter fudge recipe I got from my father-in-law this past Christmas.

Of course, I couldn’t leave it alone… and even though I could easily eat a whole pan of it as it was, I think it just got even better!

If you like Reese’s Peanut Butter Cups… at all… you will love this recipe! Super creamy, simple peanut butter fudge with a scrumptious chocolate glaze on top. Oh, yummm…

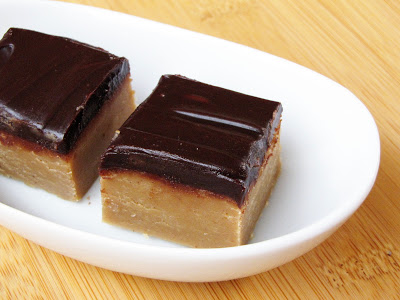
Chocolate Glazed Peanut Butter Fudge Recipe

Ingredients:
1 cup sugar
1 cup brown sugar
1/2 cup milk
5 large marshmallows
1 1/2 cups creamy peanut butter
1 teaspoon vanilla
1/2 cup heavy cream
1 cup chocolate chips*

Directions:
In a heavy saucepan, stir together the sugar, brown sugar, milk and marshmallows. Bring to a boil over medium heat, stirring until the sugars are dissolved and the marshmallows are melted.

Remove from the heat and stir in the peanut butter and vanilla. Spread into a buttered and foil-lined 8″ square baking dish. Let cool.

In a small saucepan, heat the heavy cream until just simmering. Pour over the chocolate chips in a medium bowl and let sit for 1-2 minutes. Stir well until smooth and glossy. (If the chocolate chips are not completely melted and smooth at this point, stick the bowl in the microwave for 15 seconds and stir again).

Pour the chocolate ganache over the cooled peanut butter fudge in the pan and smooth the top. Chill in the fridge for 1-2 hours, or until the ganache is completely set and then remove from the pan and cut into 1″ squares.

This fudge will keep, in Tupperware in the fridge, for at least a week… if it lasts that long!

*Use whatever kind of chocolate chips you like the best or have on hand. If you are a Reese’s Peanut Butter Cup fan like I am, milk chocolate chips are amazing for this, but dark chocolate or semi-sweet are great too!

simple sourdough stuffing

This is my version of the classic Betty Crocker stuffing recipe, and a standard for turkey dinners in my house. It is full of simple flavors that go so well with the turkey, mashed potatoes and gravy… or my favorite, mixed up with leftover turkey the next day and heated up for a cozy snack!

I have tried many different styles and versions of stuffing over the years, but when it comes to Thanksgiving and turkey dinners in general, I love this classic old-fashioned taste. The sourdough bread really does add a bunch of flavor, so don’t skip that if you can help it!

Oh, and obviously I am well aware that Thanksgiving is still 2 months away, but seeing as I have a few turkeys in my freezer right now… and I hope to be VERY busy around Thanksgiving without much spare time to be posting recipes, I decided to share this recipe with you right now! :o)

Simple Sourdough Stuffing Recipe

Ingredients:
1 large loaf sourdough or sourdough/wheat bread
1 large onion, finely chopped
2 cups chopped celery
1 1/2 cups butter
1 1/2 tablespoons poultry seasoning
2 teaspoons salt
1 teaspoon pepper
1-2 cups chicken or turkey stock

Directions:
Tear the bread into small bits (1/2″ or so) into a large bowl. Either use stale bread for this, or tear a fresher loaf the night before (or longer!) and let it sit out, uncovered, until you need it. Dry and crusty is great for stuffing!

In a large saute pan, melt the butter over medium-high heat. Stir in the chopped onions and saute until translucent… about 10 minutes. Stir in the celery and about half to two-thirds of the bread crumbs. Toast, stirring occasionally, until the bread has soaked up all of the butter and is toasted golden brown.

Pour this hot mixture over the rest of the bread crumbs in the large bowl, and add in the spices, salt & pepper, and stock (1 cup if you like it drier, 2 cups if you like it more moist! I prefer mine a little on the drier side because I like to cover it in gravy, so I only use 1 cup). Stir everything together until well blended and then pour into a 9×13″ baking dish.

Bake at 350º for 30-45 minutes, or until the stuffing is heated through! (If you don’t like a crusty top on your stuffing, you can cover the pan with foil. Personally, the crunch top is my favorite!)

If you have room in your oven to cook this with your turkey, put the pan into the oven for the last half hour of the turkey’s cooking time. (If you’re not cooking your turkey at 350º, you can easily adjust this to your turkey’s cooking temp… there’s really no wrong way to heat this, just make sure it’s heated all the way through and it’s good to go!)

This is a great recipe to prep ahead the day before. Just do all the steps up to putting the stuffing into the baking dish and then cover and store in the fridge until you are ready to bake it! (You can also use some of this to stuff into the turkey, of course. I just prefer to cook my stuffing separate because it doesn’t slow down the turkey’s cooking time that way!)

Oh, and this makes a full 9×13″ pan, so I would say it serves about 8-10 people. (Or more, if you have tons of side dishes for everyone to eat!) :o)

it’s a good thing…

there is no Top Pot donut shop on the peninsula… because I’m pretty sure if I was even an hour away from them, I would jump in the car right now and go buy a dozen of these maple-glazed old-fashioneds.

AND I would most likely have them all eaten before I got back home. :o/

Wow, that’s a strong craving. I wonder how much crap I’ll end up eating today to try and satisfy it??

classic sour cream coffee cake

Sometimes there is nothing better than the classics. Now don’t get me wrong, I love trying different things, unexpected flavor combinations, twists and turns… just ask my husband. He complains that I rarely do things the ‘normal’ way!

But today I was just craving simple. Classic comfort food to warm our hearts and our tummys and to fill the house with cozy fall smells. And a simple cinnamon-y sour cream cream coffee cake sounded like the perfect thing!

Classic Sour Cream Coffee Cake Recipe
(adapted from Gimme Some Oven)

Ingredients:
2 teaspoons cinnamon
1 1/2 cup sugar, divided
1/2 cup brown sugar
1/2 cup butter, softened
2 eggs
2 cups flour
1 teaspoon baking soda
1 teaspoon baking powder
1/2 teaspoon salt
1 1/2 cups sour cream
1 teaspoon pure vanilla extract

Directions:
Preheat the oven to 350ºF. Butter a 9×13″ baking dish and set aside. In a small bowl, stir together the cinnamon, 1/2 cup sugar and brown sugar and set aside.

In a large mixing bowl, cream together the butter and remaining 1 cup sugar until light and fluffy. Beat in the eggs, one at a time, until well mixed.

In a medium bowl, stir together the flour, baking soda, baking powder and salt. Add half of the dry ingredients into the butter/sugar mixture, then add the sour cream and vanilla and then the rest of the dry ingredients, mixing after each addition until combined.

Spread half of the batter into the greased baking dish. Sprinkle half of the cinnamon sugar mixture over the batter. Dollop the remaining batter over the cinnamon sugar in the pan and smooth out. Sprinkle the rest of the cinnamon sugar over the top.

Bake for 30-35 minutes, until a toothpick inserted in the center of the coffee cake comes out clean. Perfect warm from the oven with a big steaming mug of coffee! Mmm… I think I’ll go have another piece right now! :o)

halloween no-bake cookies

These are different than your usual no-bake cookies. Besides the ohsocute little candy corn pressed into the top, these also are missing the cocoa powder, milk and boiling time you might be used to. They are so good, and in my opinion so much better!

The marshmallows give them a wonderful chewiness and the coconut just adds another layer of yumm. Even if you don’t think you like coconut, try this once and then decide… you might just love it!

Halloween No-Bake Cookies Recipe

Ingredients:
1/3 cup butter
16 large marshmallows
1 cup chocolate chips
1/3 cup creamy peanut butter
1 teaspoon vanilla
1 cup sweetened flaked coconut
2 cups old-fashioned rolled oats
candy corn

Directions:
Melt the butter over medium heat in a medium saucepan. Stir in the marshmallows and melt them with the butter until smooth, then add the chocolate chips and continue stirring until everything is melted together and combined.

Remove from the heat and stir in the remaining ingredients. Drop onto a waxed paper lined baking sheet and immediately press a candy corn into the center of the cookie. Chill in the fridge for at least 30 minutes, until the cookies are cooled and set. These will last several days stored in the fridge in tupperware… if they last that long, that is!