toasted coconut Samoas brownies

We all know how much I like making brownies, right?

You didn’t?? Well check out all the brownie recipes I’ve got on here… I’m sure you’ll see the addiction and find something fun to make!

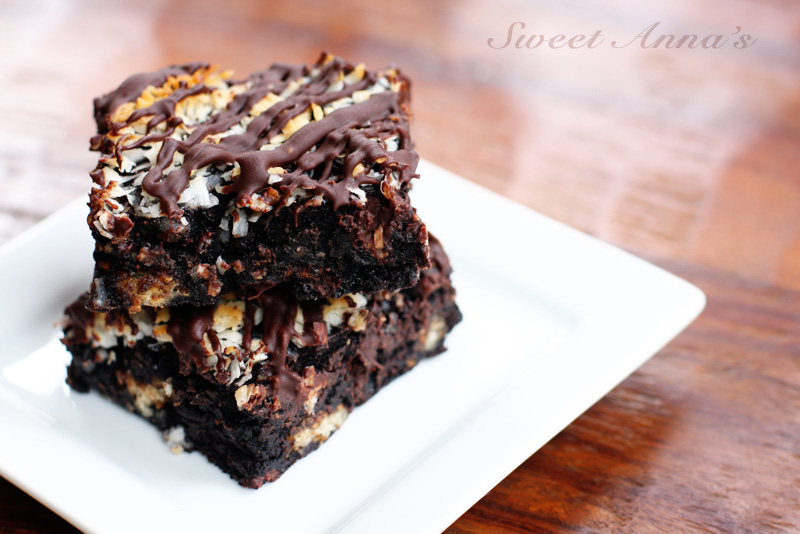
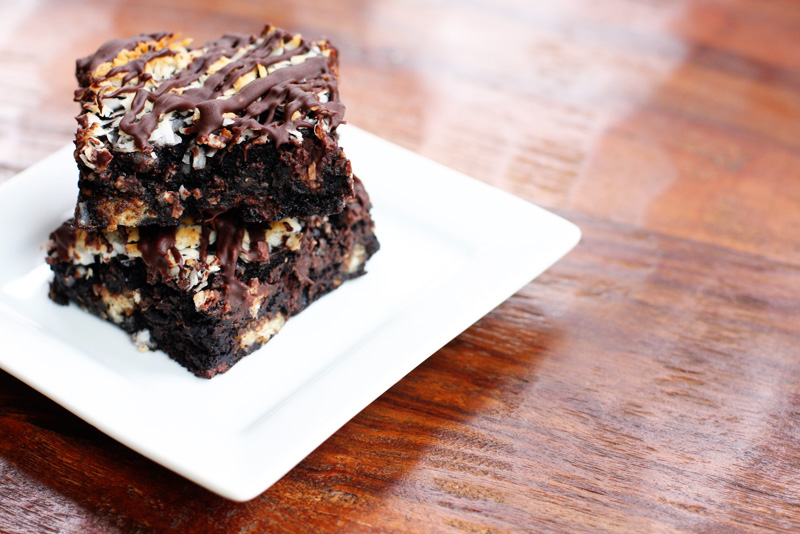
I try to change up my brownie mix-ins often, so we don’t get bored… and when I found a few boxes of Samoas Girl Scout Cookies in my freezer, I just knew what I had to make!

These brownies are rich, fudgy, chewy and loaded with flavor. A little goes a long way, so make these for a crowd!

If you don’t have a stash of Samoas Girl Scout cookies hiding in your freezer like I do, then a good substitute would be about 2 cups of chopped caramels mixed in, or swirl some caramel sauce into the brownie batter before baking. Heavenly!

Toasted Coconut Samoas Brownies Recipe

Ingredients:
3/4 cup dutch-processed unsweetened cocoa powder
1/2 teaspoon baking soda
2/3 cup butter, melted & divided (1/3 cup + 1/3 cup)
1/2 cup boiling water
1 cup sugar
1 cup Wholesome Sweeteners Organic Coconut Palm Sugar
(or firmly packed brown sugar)
2 large eggs
1 1/3 cups flour
1 teaspoon vanilla extract
1/4 teaspoon salt
1 cup chocolate chips
1 box Samoas Girl Scout Cookies, coarsely chopped
1 cup sweetened flaked coconut (more if you like!)
1 cup chocolate chips, melted for drizzling - optional*

Directions:
Preheat your oven to 350ºF, and butter a 9×13″ glass baking dish.

In a large mixing bowl, stir together the cocoa and baking soda. Stir in 1/3 cup of the melted butter until smooth. Stir in the boiling water until the mixture is smooth and thick. Stir in the sugar and eggs with the remaining 1/3 cup melted butter.

Place the 1 cup chocolate chips (and caramels if you are using them!) in a small bowl and sprinkle with 1 tablespoon of the flour, tossing to coat.

Into the chocolate mixture, stir in the remaining flour, vanilla and salt until just smooth. Stir in the flour-coated chocolate chips and the chopped cookies and spread the mixture into your prepared baking dish.

Sprinkle evenly with the coconut and press down gently into the batter.

Bake for 35-40 minutes, or until the edges start to pull away from the pan. (Always better to under-bake than to over-bake brownies!!) Cool completely in the pan.

*If you’d like, melt 1 cup of chocolate chips in the microwave and then drizzle on top of the cooled brownies for decoration. Not necessary at all, but it sure looks pretty!

almost Beecher’s famous mac & cheese

Because you can never have too many great mac & cheese recipes in your back pocket…

And because Beecher’s mac & cheese was really my first glimpse into the world of amazing mac & cheese…

And because I don’t live 5 minutes away from Beecher’s anymore…

I finally made their famous mac & cheese.

(Last week. Not yesterday. Yesterday I did nothing but snuggle my sweet brand-new baby!)

And yep, it’s as good as I remembered it!

Better, of course, if I could splurge and use real Beecher’s cheese in it, but since I have Tillamook on hand, Tillamook is what I used.

This mac & cheese is creamy, rich, smooth and a tiny bit spicy.

Not too spicy though. Don’t let the spice scare you, it’s just a hint… but the chipotle chili powder is a must for this dish!

Almost Beecher’s Famous Mac & Cheese Recipe
adapted from Beecher’s via Martha Stewart

Ingredients:
1 pound penne pasta, or other short pasta
1/4 cup butter
1/3 cup flour
3 cups milk
3 1/2 cups shredded sharp white cheddar cheese (aged Tillamook is great here!)
1/2 cup monterey jack cheese (or mozzarella or more cheddar if that’s all you have)
3/4 teaspoon salt
1/2 teaspoon chipotle chili powder
1/4 teaspoon garlic powder
for the topping:
1/2 cup shredded cheddar cheese
1/2 cup jack, mozzarella or more cheddar cheese
1/4 teaspoon, or so, chipotle chili powder

Directions:
Preheat the oven to 350ºF and butter a 9×13″ baking dish.

Cook the pasta, according to package directions, about 2 minutes less than done.

Meanwhile, in a large pan, melt the butter over medium heat. Whisk in the flour and cook, stirring constantly, until light golden brown. Slowly whisk in the milk and cook, stirring until thickened… up to 10 minutes.

Turn off the heat and stir in the cheeses and spices until smooth. Stir in the noodles and pour into the buttered baking dish.

(*If you are making this dish ahead, stop here, cover with foil and place in the fridge or freeze!)

Sprinkle evenly with the cheeses and a bit of chipotle powder and bake for 25-30 minutes, until bubbly and golden!

She’s here!!!

Baby Girl is here!

Maren Ree decided to make her grand entrance early this morning, 3 weeks before her due date!

She was born at home - on our bedroom floor! :o)

I will share her birth story with you soon…

But for now, here are some pictures and stats!

Maren Ree was born at 12:39am this morning, July 24th.

She is a tiny little thing, weighing 6lbs 8oz, and is just over 18 inches long.

Labor was just under 8 hours from first contraction, and boy am I glad it’s over! :o)

It feels so good not to be pregnant anymore!!

37 weeks down… any time now!

Well, Baby Girl is free to come whenever she wants now! WooHOO!!

What an amazing feeling that is!

Of course, we all know that she could very well decide to stay put for another month or even longer, and that’s ok (Hey… I’m trying to stay positive here!) but I would sure love to see her sooner than later.

Nesting is in full-swing around these parts and it feels good. Nesting is definitely one of my favorite parts of pregnancy.

A huge burst of energy, fueled by cleaning and organizing urges… pretty sure my husband loves my nesting-sprees too!

I am leaving the ‘cravings‘ phase of pregnancy and entering the ‘I don’t have room for anything in my stomach and nothing really sounds good anyways‘ stage. Not so much fun, but it does mean the end is near, so I’ll take it.

I really am bummed that I couldn’t follow through on my monthly belly pics this time around…

Things got a little too stressful for us for a while there and I just couldn’t handle one more thing. :o( In case you haven’t tried it before, taking self-portraits (especially with two rambunctious non-napping toddlers around!) is not any easy thing!

I am determined to at least get one final picture though, so keep an eye out for it soon.

(By the way, Baby Girl is apparently the size of a winter melon now… Whatever that is!)

My freezer is filling up with meals and treats…

Baby clothes, diapers & mama cloth are being washed and organized…

Brothers are getting excited (and starting to think Mommy needs to go to the doctor because my belly-button looks so funny to them!)

And Mommy & Daddy are just holding our breath waiting!

Come out when you’re ready Baby Girl! We are so excited to meet you!!

(Sorry about the slacking in blog-postings lately… I promise I will be back to some sort of new normal eventually! For now, thanks so much for your patience with me… and don’t forget to look through the archives for some great recipes!!)

cheesy chipotle barbeque meatloaf

So, when I realized this week that Baby Girl really could show up at any time now, I decided to finally do a mini freezer-cooking marathon.

One of the easiest things I made was meatloaf… one of my favorite comfort foods that no one else in my family seems to care much about!

But, since I am the pregnant one and doing all the work, I decided to go with my own cravings this time.

The rest of the family won’t starve, that’s for sure!

I did try to make things a little more fun though, but making barbeque meatloaf laced with a nice kick of chipotle chili pepper and lots of chunks of mozzarella cheese.

I think my family might actually get a little excited about this meatloaf!

(Which is a good thing, since we have at least 2 meals worth in the freezer now!)

Cheesy Chipotle Barbeque Meatloaf Recipe

Ingredients:
3 pounds ground beef
1 cup barbeque sauce, divided (1/2 cup + 1/2 cup)
1 teaspoon chipotle chili powder
1 teaspoon garlic powder
salt & pepper
1 large onion, finely chopped
2 eggs
1/2 cup bread crumbs or cracker crumbs, optional
1 1/2 cups diced mozzarella cheese

Directions:
Place all the ingredients, except for 1/2 cup of the barbeque sauce, into a large bowl. Quickly and gently mix all the ingredients together with your hands until everything is mixed. Don’t over work the meat or it will get tough!

Shape into loaves (this will make 2 large loaves, or 5-6 small loaves) and brush the tops with the remaining barbeque sauce.

Bake at 350º for 45-75 minutes, depending on the size of the loaves, until the meat is cooked through.

If you want to freeze some of the loaves (I freeze half to two-thirds of them, depending on how many people I am feeding with the first meal!), wrap them in foil unbaked and place them in a ziploc bag.