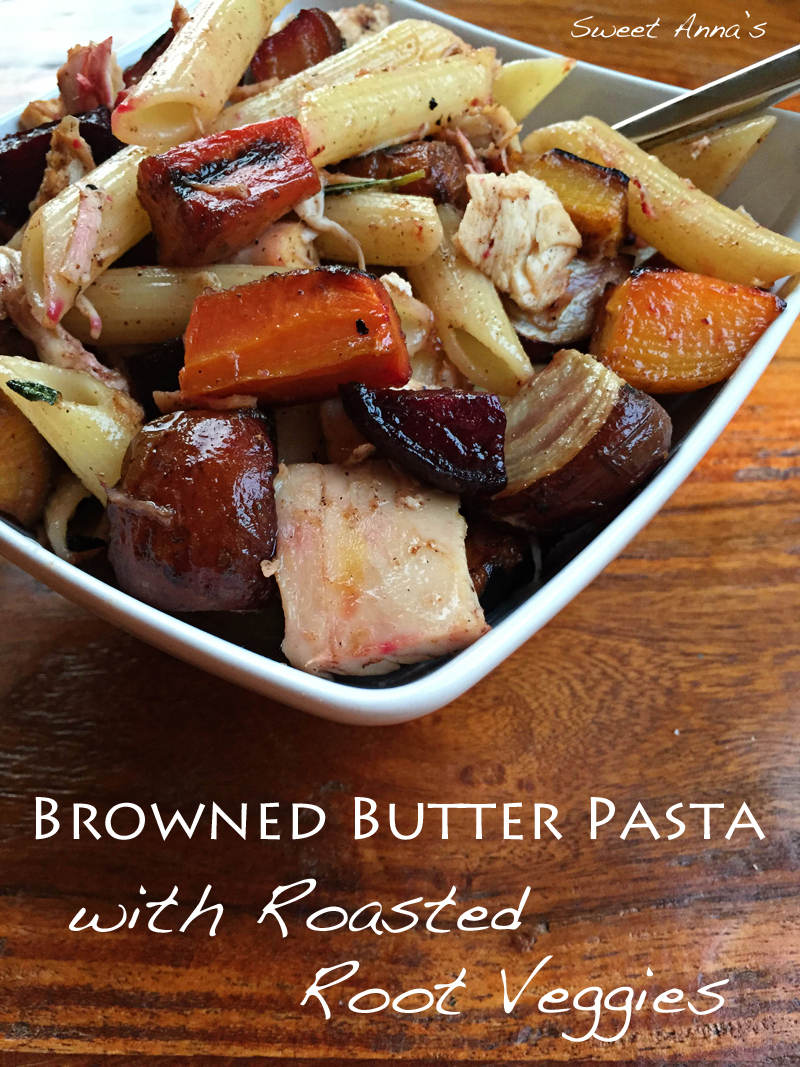
oven roasted cabbage

Oh my word.  How have I not had this deliciousness in my life before now??

I adore cabbage.  Always have.

My mom used to make me big bowls of steamed cabbage with butter and salt for lunch when I was little, and I have loved it that way ever since.

So, I guess I never thought about trying something new…

If it’s not broke, don’t fix it, right??

Well, I wish I had tried this years ago, because I am absolutely hooked on this new version of my beloved cabbage!

Unfortunately my sweet little nursling was not as fond of this treat as I was, so it will be a while before I will be able to make this again, but I will enjoy it oh so much when I can!

And if you think you don’t like cabbage…  try this, k?  You just might become a convert!!

oven roasted cabbage

Ingredients

  • 1 head green cabbage
  • 2 tablespoons extra virgin olive oil
  • salt & pepper, to taste

Directions

Preheat the oven to 400ºF. Line a baking sheet with foil.

Remove the outer leaves of the cabbage and discard. Cut the cabbage straight down into several thick slices.

Lay the slices out on the baking sheet, and then drizzle generously with olive oil and salt & pepper.

Roast for about 30 minutes, until the cabbage is starting to brown. Serve immediately, with more salt & pepper to taste!

http://sweetannas.com/2013/02/oven-roasted-cabbage.html

pasta with roasted winter veggies & browned butter

Our favorite little local farm store sells big grab bags of root veggies for roasting.  It’s so much fun to get a variety of things we might not normally try and everything tastes so great roasted together!

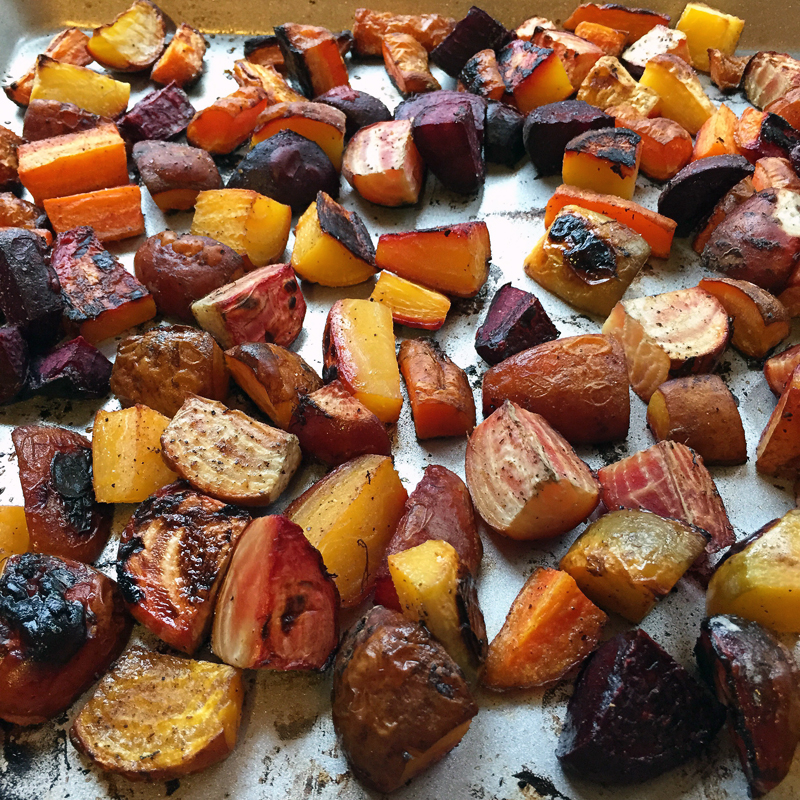
This last bag had carrots, purple and russet potatoes, red and golden beets and what I think are parsnips.  :o)   I added a big red onion and some garlic cloves and tossed it all in a good dose of garlic infused and regular olive oils, salt & pepper, and a bunch of dried herbs – basil, oregano & parsley.

Let me just tell ya…  from the minute this was put in the oven, the whole house smelled amazing!

Because I am a pasta addict, I decided to boil some penne and make a simple browned butter sauce to toss it all together with.  So simple, so easy, and absolutely packed full of flavor.

(Please, please serve this with freshly shaved parmesan cheese.  I was out but it would be amazing!!)

 (Please excuse this crappy iPhone picture.  I was hungry and Maren was crying!)

pasta with roasted winter veggies & browned butter

Ingredients

  • 5 lbs, or so, root veggies, variety /9carrots, potatoes, parsnips, beets...)
  • 1 large onion
  • 2-3 cloves garlic, smashed or whole
  • 1 tablespoon garlic-infused olive oil, optional
  • 2-3 tablespoons extra virgin olive oil
  • salt & pepper
  • 1 tablespoon, or so, dried herbs (parsley, basil & oregano)
  • 1/2 teaspoon crushed red pepper flakes, optional
  • freshly shaved parmesan cheese

Directions

Preheat the oven to 400ºF.

Cut all the veggies and onion into large bite-sized pieces. Place all the veggies and garlic on a large rimmed baking sheet.

Drizzle with olive oils, herbs and salt & pepper to taste. Toss well with your hands to make sure everything is coated.

Place on the second to top rack in the oven and roast for 30-45 minutes, until all the veggies are tender and golden. Remove from the oven and set aside.

While the veggies are roasting, boil a large pot of salted water and cook the noodles according to package directions.

While the water is boiling, melt a stick of butter in a large skillet (preferably light colored interior, but not necessary!) over medium heat.

Continue to cook, swirling occasionally until the butter starts to foam and then turn golden. Watch closely at this point, as it can burn easily. As soon as the butter looks golden (here's where the light-colored skillet helps!) and smells very fragrant, pull it off the heat.

Toss everything together in a large bowl or in the now drained pot and serve with freshly shaved parmesan cheese if desired!

http://sweetannas.com/2013/01/pasta-with-roasted-winter-veggies-browned-butter.html

old-fashioned bacon fried potatoes

Crispy on the outside, creamy on the inside, smoky, salty and fragrant of bacon…  These fried potatoes are comfort food at its finest!

My grandma made these potatoes just about every week when we were growing up.

They are a perfect use for leftover potatoes and in my very norwegian Grandma’s kitchen, there were always potatoes around!

This is one of those incredibly memory-rich foods for me…

Just smelling them cooking in the pan brings back floods of memories and feelings.

If I close my eyes, I can almost feel the warmth and bright chaos of my Grandma’s kitchen, and sometimes I can even hear her orchestrating everybody’s moves in the cozy space.

The real beauty of this dish is that you can use any potato, in almost any form.

Raw, leftover baked, boiled, even mashed…  the most important part is the bacon grease used for frying.  It makes all the difference.

If you don’t keep bacon grease in your fridge like I do, (but you should! It’s amazing in soups, especially!), then just plan on serving bacon with these potatoes and fry it up first so you have the grease to use for the potatoes.

Yum!


old-fashioned bacon fried potatoes

Ingredients

  • 3-4 potatoes
  • 2-3 tablespoons bacon grease
  • Johnny's seasoning salt, to taste

Directions

Heat the bacon grease in a large pan over medium heat.

Cut up the potatoes into bite-sized pieces and dump into the hot pan.

Fry, seasoning to taste and stirring gently but not too often so that the potatoes get all golden and crispy on the outside... while soft and tender on the inside!

http://sweetannas.com/2012/10/old-fashioned-bacon-fried-potatoes.html

*In case you noticed, or were wondering…  yes, that is my new range from Kenmore!  I will be telling you guys all about our new appliances soon!

homemade pico de gallo salsa (aka Andrew salsa!)

Adding to the list of Things Andrew Makes Better Than Me is this salsa.

It’s not that I couldn’t make this as well as him if I wanted to, it’s just that I’m generally too lazy.

As in, when I make salsa, all these ingredients go straight into the food processor to get chopped up quickly and easily.

But no, it doesn’t taste quite as good as this way.  Still good, but not the perfection that Andrew’s salsa is.  :o)

I know this seems like quite a large batch, but trust me…  it won’t go to waste!

And now I’m curious:  Do you prefer your salsa chunky like this (pico de gallo style) or more blended up?

Homemade Pico De Gallo Salsa (aka Andrew Salsa!) Recipe

Ingredients:
12 roma tomatoes
1/2 large red onion, finely chopped
1 bunch green onions, whites and light greens chopped
3-4 cloves garlic, finely chopped
2 large limes, juiced
2-3 jalapeños, finely chopped – with or without seeds, to taste
fresh cilantro, chopped
salt & pepper, to taste (we use about 1/2-1 tablespoon salt + 1 teaspoon pepper)

Directions:
Cut the tomatoes in half and gently scoop out the seeds and juice and discard;  Dice the rest.

In a large bowl, gently stir together the diced tomatoes and the rest of the ingredients.  Taste for spice and seasoning, adjust where necessary, and enjoy with chips!

This salsa keeps well for a day or two…  and actually tastes best on the second day, so feel free to make it ahead!

baked quinoa mac & cheese

For some reason, I always seem to forget about quinoa.  And then I am pleasantly surprised every time I remember to make something with it again.

This quinoa ‘mac’ & cheese was such a delicious treat!

I saw the idea and knew that it was something my mac & cheese loving family had to try right away…  And I’m so glad we did!

It was a hit with everyone except picky 3 year old Bjørn, who I’m sure just wouldn’t eat it because he saw me make it (He doesn’t like to know what’s in his food!).

This dish has all the rich, gooey flavor of your favorite mac & cheese with a whole lot less guilt in a healthy, protein-packed punch.

If you’ve never tried quinoa before, because you’re not sure how you’d like it…  this recipe would be a great place to start and give it a try!

Baked Quinoa ‘Mac’ & Cheese Recipe
adapted from Monica Nelson Fitness
serves 4-6, and can be easily doubled into a 9×13″ pan!

Ingredients:
1 tablespoon olive oil
1-2 cloves garlic, minced
3/4 cup quinoa, rinsed well and drained
1 1/2 cups chicken stock
salt & pepper
1/2 teaspoon onion powder
1 large egg
3/4 cup milk
2 cups shredded cheese (cheddar & pepper jack are great!)
1 cup shredded cheese, for topping

Directions:
Heat the oil in a medium skillet.  Sauté the garlic for a few seconds and then add in and sauté the quinoa for about 5 minutes, stirring occasionally.

Add in the chicken stock, salt & pepper, and onion powder, stirring well.  Bring to a boil, then reduce the heat to low, cover tightly and simmer for 15-20 minutes, until most of the liquid has been absorbed.

While the quinoa is cooking, preheat the oven to 350ºF and lightly grease an 8″ or 9″ square baking dish.

When the quinoa is done, let it sit off the heat for about 5 minutes while you whisk together the egg and milk in a small bowl.  Quickly stir the liquid into the pan of quinoa with the 2 cups of cheese and dump it all into the prepared baking dish.

Sprinkle the remaining cheese over the top and place in the oven to bake for 25-35 minutes, until the cheese is bubbly and golden brown!

Related Posts Plugin for WordPress, Blogger...